Outfit post: The Batter-Up! daydress
So this has taken forever! I finished this dress over the summer and have worn it a whole bunch of times. I was pretty damn pleased with the results. I did a post on the making back in August (August!?!?!) and here we are, live in the in the flesh. Or fabric.

I admit that a big part of what keeps me from blogging about my finished garments is really that I have a hard time snagging a good spot to take photos. With a 5 year old in the house and my full-time job plus teaching nights I get caught up with myself and have a hard time wanting to tear myself away from sewing versus taking pictures of the dresses and outfits I so love wearing.
I am This reminds me of my most-hated habit people have in online dating personal ads: I'm so busy I can't meet people the usual way. Ugh. You're too busy to meet people? Great. Sounds like we have a great chance at making a go of things. *sigh*
Dear readers, whoever you might be, I promise not to make sucky excuses in future about not being able to snap a few photos. Poor snaps are better than no snaps. Done. Moving on.

This was my first try at making a dress with a pleated skirt. Like I said at the start, super pleased with the results! I did it free-hand using inverted box pleats. The only thing that really went wrong was the alignment of the front pleats with the waist darts. Fortunately the busy print keeps anyone by me from noticing. Woo?
Dress- me-made, fabric from SR Harris
Cardigan- Gap outlet, shortened by me, similar here: Kinny and Howie
Shoes- Earth Shoes Solstice
Bracelets- various spots
Necklace- Christmas gift from my stepdad a few years ago
Choosing Patterns, some how's and why's
My closet is a dense forest of me-made wardrobe items. Crammed and straining. And yet, i cannot stop myself from sewing more things to wear. I used to get sad and wistful looking into my closet, wishing I had something I was excited to wear. After I started making my own gear my closet visits transformed! Now I stand before my closet flooded with excitement about which awesome, exciting, well-fitting outfit to wear today

On the right you can my sweater bag. Cardigans in many colors and shapes, organized into warm, cool and neutral stacks. In truth, my sweater bag lives in my dude's closet. Mine, although the larger of the two bedroom closets, isn't big enough. It's love.
So with so many fun choices how do I decide what to make next? How do I balance pattern selections? What makes a good scale, color, texture choice? Below I'll walk you through some snaps of a recent trip our to my favorite fabric warehouse! Most of my fabric choices are a variety of quilting cottons, which simplifies things a bit. I like working with quilting cottons, easy to sew, easy to care for and SO MANY CHOICES!!!

Here's a stack I had gathered up, trying to work out what I should get and what wouldn't make the cut! If you ever see that weird lady in the fabric store draping fabric over herself... think of me. I'm that lady. It's really one of the best ways to understand how a pattern will be affected by the curves of your body, whether the scale will work for you, if the color is flattering.
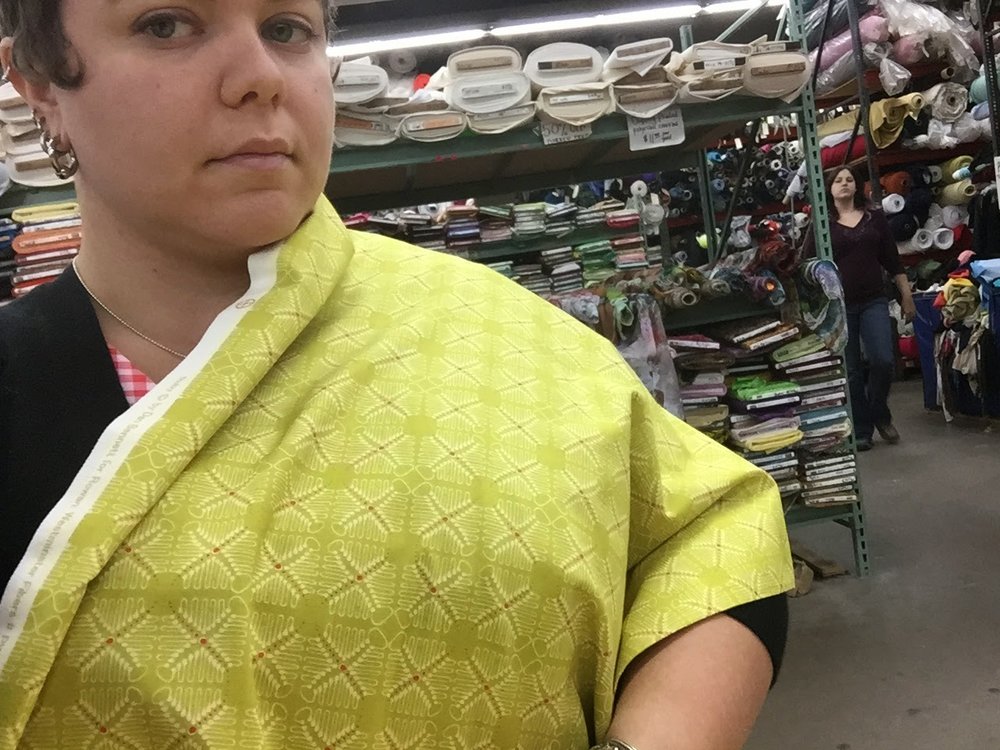
This pretty light yellow-green fabric was a definite thumbs-down. Looking at my skin next to this fabric I felt super washed out. I love the scale and that the pattern offers fun possibilities for using on-grain or on-bias. Sadly, it didn't make the cut.

I struggle with feedsack patterns. I really liked this color but this particular fabric was a plaid crepe with varying levels of sheerness/opacity. I don't like to line my skirts so this one didn't make the cut either.

Oh man, I went back and forth on this fabric for a long time. I think I worked through the stack and came back to it 2 or three times. I so love the energy of this print, it's a little wild and fireworks-y and the shade of pink is nice and versatile. I loved the idea of the fabric in a skirt and kept imagining twirling in a circle skirt of pink fireworks... but I could not get a good image in my head with the fabric for a bodice. Who knows, perhaps next time I will see the boom boom pow pattern again. Didn't make it this time.

At this point I am guessing you might be wondering well... what did you get? I loved this crosshatch. I like the smallness of the different elements in the pattern and how it is balanced out by the all-over, irregular cross-hatch. From a few feet away the pattern did not break into distinct boxes or stripes, also a major plus. The dots here are green, blue, white and brown. The background is pink with a darker pink crosshatch. Very flexible for cardigans. We had a winner!

You can kind of see it in my secret-excited little smirk here; I loved this fabric. It said, Barbie Throws a Party or Donna Reed's Summer Shindig or Please Wear Me With Little White Gloves!!! I brought this one home. Classic polka dots with bold pink roses breaking things up. I like irregular polka dots as I find that straight polka dot matrices make my eyes water, they look like they are vibrating. So this was a perfect solution.

Sadly, one more that did not make the cut. These are the kinds of fabrics and patterns that I really love and really wish worked for me. You can see how wan and washed out I look next to it. The pattern has a fun Deco look but I just couldn't get something that would look so blah in color next to my skin.
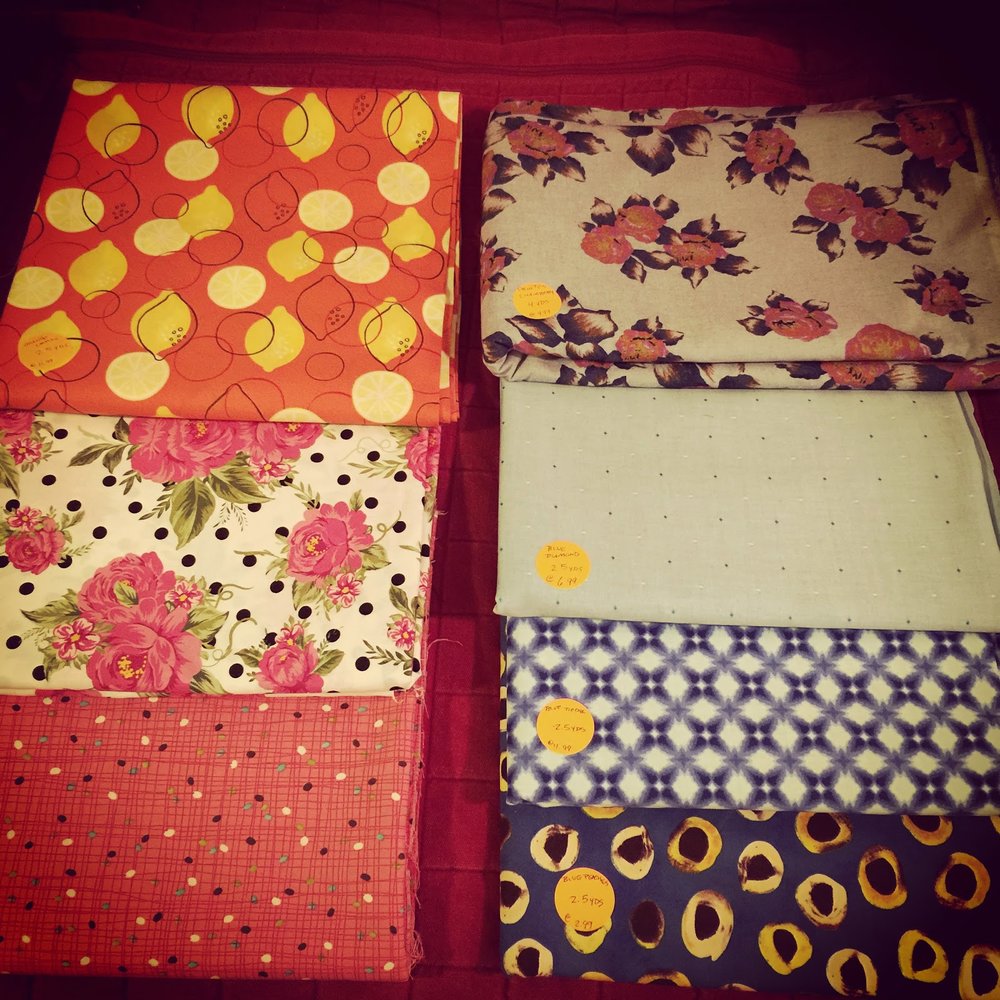
I regularly make another round through the store after cutting my initial choices. First off, they ask you to reshelve your fabrics yourself. Second, I almost always feel like I will find one more thing now that I am in the zone. Here is a shot of all the lucky home-comers from the last go-around. You can see a whole bunch of things that didn't make the pictures. Some of these I felt so strongly about I didn't both with pictures for. I have finished 4 dresses from these fabrics so far. The Lemon Surprise fabric was a 2nd round find as was the chambray with discharge print roses in the upper right hand corner.
I finally got a tripod for my camera so more outfit posts on the way! Hurray! Hopefully this helped expand your horizons of print and pattern possibilities!
xo,
Sarah
Outfit post! Mint and peachy brights to warm a chilly morning
Hi friends! here's a quickie post on today's outfit. I am going to try to get on a track of including at least one outfit post a week. The biggest obstacle to me getting these done is that I am terrible at taking pictures of myself! Part of getting myself out of my comfort zone, though is to learn to take some good selfies. I am itching to get my hands on a smartphone-friendly tripod. Maybe one like this:
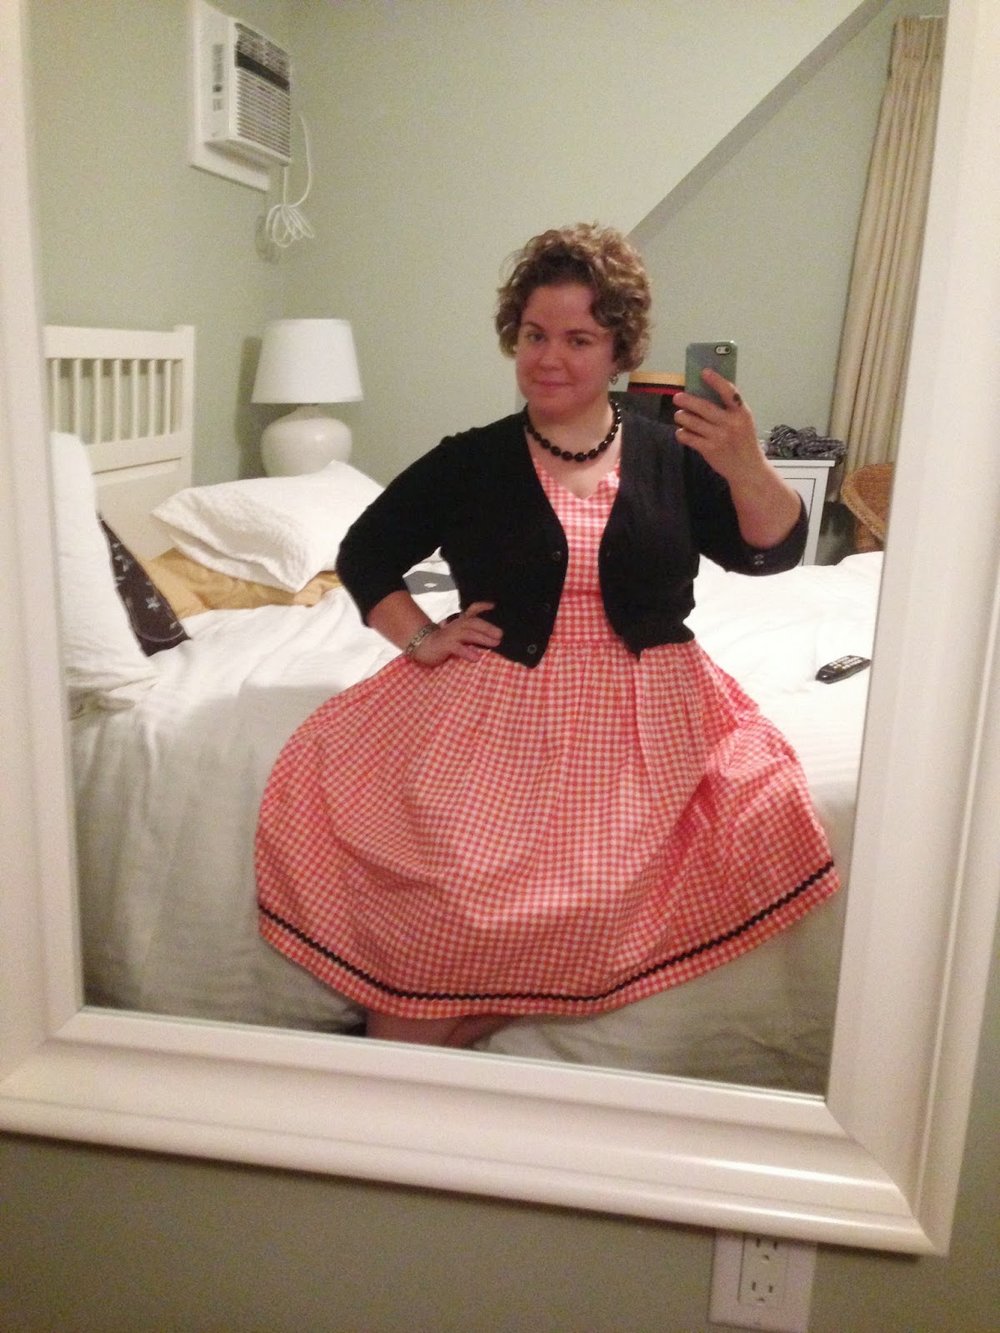
If you will forgive me my poor selfie skills at current I promise to keep working on them! Without further ado... The Baronica dress! Our friend Barry and Monica got hitched in August and you might recall that I shared some images of this dress before, just after I finished it.

I applie teal rick rack of differing sizes at the neck and hem and also finished the inside hem with some bright orange grosgrain ribbon which adds a fun pop of color when the hem flips up. I have been surprised how many colors pairs well with this combo and find myself rotating between shades of pink, orange, black and brown when I pair the dress with a cardigan.
Sometime soon I'll post a step-by-step on how I have shortened my legion of cardigans to better suit the proportions of my dresses and skirts. It's super easy and makes the world your oyster of cardigan shopping! I've been bummed to find that so many cropped cardigans are acrylic and nylon based. Blech.

I'm trying to eek out a few more wears of my summer sandals. I love these Azalea's by Earth Shoe. Really supportive, comfy and aesthetically on-point for all of my favorite 40's and 50's dresses that scream, "I need brown sandals!" (Please forgive the wrinkles... I need to buy a steamer since no amount of ironing seems to banish the crinkle!)
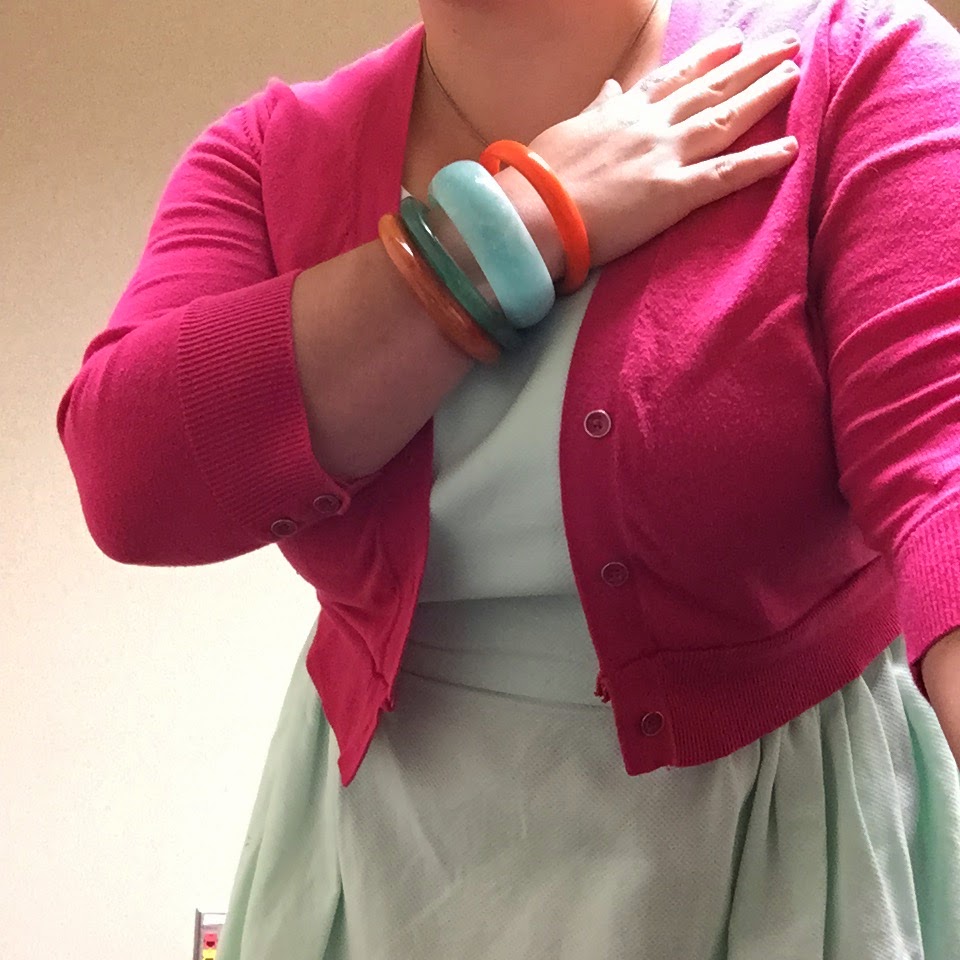
My bracelets today are a mix of Bakelite and plastic. The three thinner bangles are each marbled in subtle ways. the top bangle is a bright orangey pink that I am working (very slowly!) to remove the patina from. I'm anxious to hear any tips anyone has!
Outfit details:
Dress- me-made, fabric from The Textile Center garage sale
Cardigan- Gap outlet, shortened by me, similar here: Kinny and Howie
Shoes- Earth Shoes Azalea
Bracelets- various spots, antique malls around the Twin Cities
Necklace- Seratonin necklace from my pal Laura when I was getting ready to move to MN
Today's post is brought to you by coffee. Spilled on me leaving the house.
Laziness and a lack of knowledge ruin wardrobes. It's true. I'm sure that when lots of us get an oil stain or some such thing on ourselves we think, "Well, there goes that dress/shirt/skirt/whatever." Particularly with t-shirts. It just never seems worth pursuing an alternative... or does it? When you rock vintage, me-made or otherwise investment garments you need to know your way around a stain remover.
Today I'm gonna share a few of my most favorite solutions to those wardrobe-destroying woes. All thanks to my mama, really.
I grew up with an amazing mom who just knew how to do... anything. Install a toilet? Make a perfect Christmas cookie? Sew a shirt? Yup. Remove a stain? Absolutely. She would re-attach buttons, shorten pants and fix busted seams. I thought it was normal. I wanted to be just like her. I keep these things in my cleaning closet just for those occasions when life, you know, just seems to happen.
 #1 Carbona Stain Devils
I remember picking these up in the super market when we ran out of some formula. I don't remember which ones we kept around. I just knew that there were special formulas depending on what your stain was made of. In grad school I understood much better the chemistry behind these and what a miracle they really are. In my house as a grownup I keep the Fat & Cooking Oil formula as well as the Wine, Tea, Coffee and Juice formula.
You can order them online or find them at your local Jo-Ann's.
 #2 OxiClean
I hardly think there's a person in US who hasn't heard of this one. But, what you might not think of with OxiClean is that it is wonderful for removing age spots and marks from vintage fabrics and linens. Whenever my mom (who now runs an antiques shop) or I come across linens that look well taken care of but no less dingy and needing a little love, we use this. A recent batch of vintage homespun napkins came home with me covered in spots and emerged from oxiclean soaking to be a clean, even cream color. As they should! Remember to run anything you've soaked through the regular wash, too.
 #3 Synthrapol Detergent
Looks boring and bland, right? Wrong! While I would use Carbona for known stains and OxiClean for less known stains I use Synthrapol for all sorts of fabric cleansing. When clothes are very dirty, have sweat stains, keep shedding dye (like when you buy an indigo-dyed fabric), Synthrapol is my go-to. I started using this in college during my Fibers classes to rinse hand-dyed textiles. It's safe for home use and super efficient. A very small amount go a long, long way! I'll soak the family tablecloth in this after a holiday and have an easy-peasy time getting the marks out. It's gentle on fibers and tough on stains. Also, it has no added colors or fragrances!
All three products are pretty affordable and findable. I've included links in the title bits of each for your easy reference. Keep these ideas in your back pocket (or laundry closet!). It sure helps to know there's hope for your "ruined" clothes when you are livin' la via me-made!
xo
Sarah
Today I'm gonna share a few of my most favorite solutions to those wardrobe-destroying woes. All thanks to my mama, really.
I grew up with an amazing mom who just knew how to do... anything. Install a toilet? Make a perfect Christmas cookie? Sew a shirt? Yup. Remove a stain? Absolutely. She would re-attach buttons, shorten pants and fix busted seams. I thought it was normal. I wanted to be just like her. I keep these things in my cleaning closet just for those occasions when life, you know, just seems to happen.
I remember picking these up in the super market when we ran out of some formula. I don't remember which ones we kept around. I just knew that there were special formulas depending on what your stain was made of. In grad school I understood much better the chemistry behind these and what a miracle they really are. In my house as a grownup I keep the Fat & Cooking Oil formula as well as the Wine, Tea, Coffee and Juice formula.
You can order them online or find them at your local Jo-Ann's.
I hardly think there's a person in US who hasn't heard of this one. But, what you might not think of with OxiClean is that it is wonderful for removing age spots and marks from vintage fabrics and linens. Whenever my mom (who now runs an antiques shop) or I come across linens that look well taken care of but no less dingy and needing a little love, we use this. A recent batch of vintage homespun napkins came home with me covered in spots and emerged from oxiclean soaking to be a clean, even cream color. As they should! Remember to run anything you've soaked through the regular wash, too.
Looks boring and bland, right? Wrong! While I would use Carbona for known stains and OxiClean for less known stains I use Synthrapol for all sorts of fabric cleansing. When clothes are very dirty, have sweat stains, keep shedding dye (like when you buy an indigo-dyed fabric), Synthrapol is my go-to. I started using this in college during my Fibers classes to rinse hand-dyed textiles. It's safe for home use and super efficient. A very small amount go a long, long way! I'll soak the family tablecloth in this after a holiday and have an easy-peasy time getting the marks out. It's gentle on fibers and tough on stains. Also, it has no added colors or fragrances!
All three products are pretty affordable and findable. I've included links in the title bits of each for your easy reference. Keep these ideas in your back pocket (or laundry closet!). It sure helps to know there's hope for your "ruined" clothes when you are livin' la via me-made!
xo
Sarah
Travel packing and livin' la vida me-made.

Vacation in progress! Here we are in Cape Cod, MA ready to get our Yaaaay! on right before Barry and Monica began their epic walk down the aisle. Mike looked amazing in his seersucker suit and Venetian boater hat. Sometimes he tries to rebel against his hipster-inclined ways but I am usually able to cajole him into owning it. He's a beautiful man and can pull of strong colors and statement pieces. Once he takes the plunge he rocks it pretty hard. I knew he would for this trip, too.
I wore a modified version of Butterick 5748. It's the regular bodice with the notch in front. I had previously made the neck-gape adjustment to my pattern pieces and the tiny amount of leftover gape was handled beautifully by the ease created by the notch. I added an extra-full gathered skirt and in-seam pockets for this version and am pretty pleased with the results over all! This is the first time I applied a rick rack trim over the surface instead of as an edge treatment. It was also the first time I used the basted-shut zipper technique I saw here. I have done once or twice since then and will definitely be incorporating it into future garments!


.JPG&container=blogger&gadget=a&rewriteMime=image%2F*) Certainly I must be getting ahead of myself, though! In my last post I talked about sharing some of my me-made wardrobe travel tips and observations.
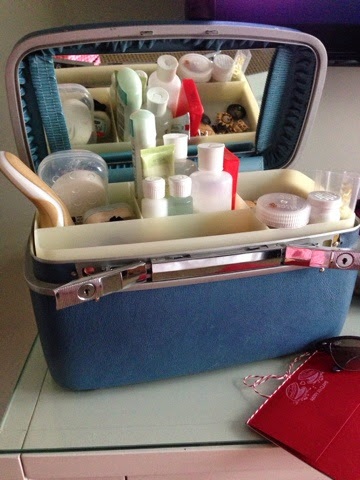
Certainly I must be getting ahead of myself, though! In my last post I talked about sharing some of my me-made wardrobe travel tips and observations. Here are a couple of shot showing my packing in-progress. I hung out all of the dresses I planned to take on this trip so that I could coordinate jewelry and shoes. I tend to gather everything up on the bed before starting to fit it into my bags. I have been traveling with a 1-bag rule for a few years now. The addition of my train case is definitely a break of tradition and I wanted to make sure I wasn't just taking along additional things for the hey of it.
When packing I come to a point that I just know that I have reached the tipping point. I prefer to leave a little extra room in my bags to allow me to bring home treats for myself and my stepdaughter.

2- becomes difficult to carry it all solo
3- risk of loss is too high
4- mid-trip changes increase risk of loss
5- traveling with vintage or me-made means not being able to replace things = heartache
I've encountered a lot of drama in my travel. I have learned to cut it out wherever possible.
Because I'm a nutball I, of course, had a last dress in-progress the night before we left. I promised myself (and my boyfriend who kept eyeing my pile of dresses with trepidation and a hairy eyeball) that if I finished the new dress one of the trip dresses would come out of the pile and the new dress would get work on the plane.
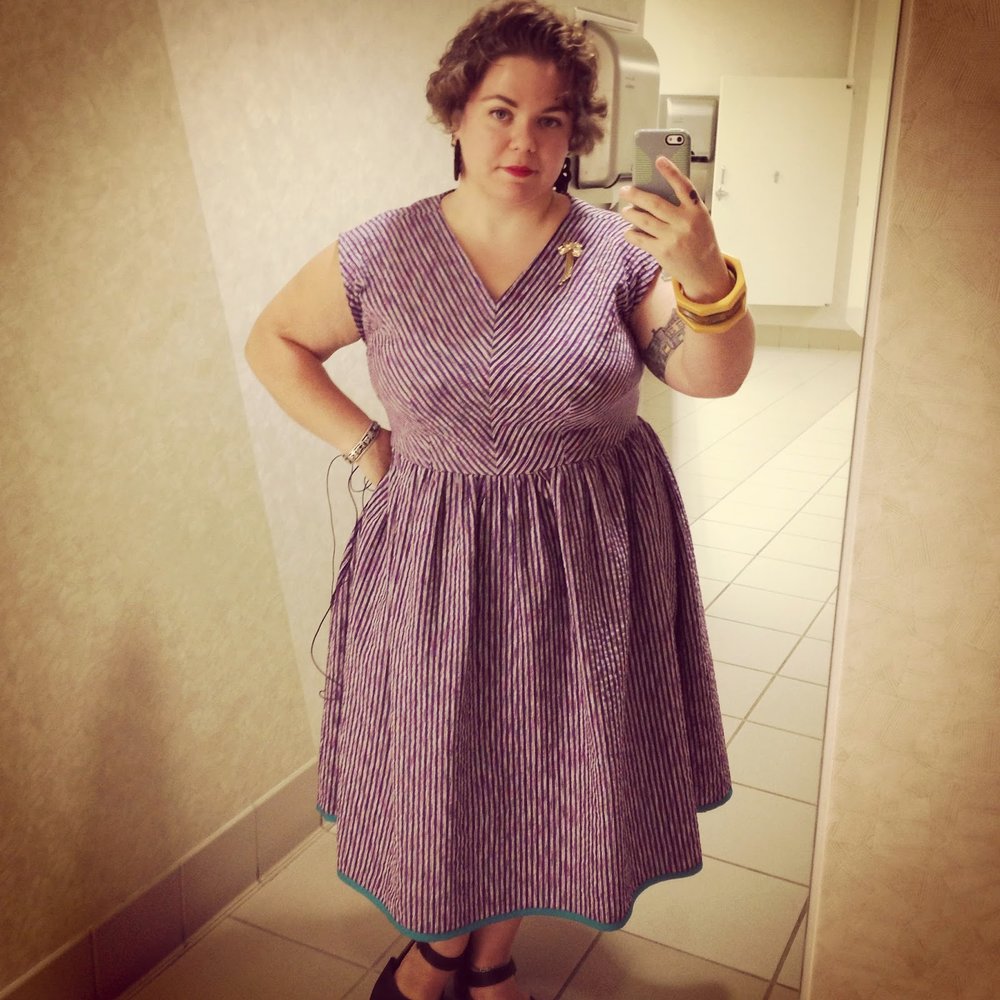
I've been working on tweaking a self-drafted bodice to include a v-neck. In the purple striped dress below it worked out quite well! After making the pink dress I think the bias is the reason is worked so well.
In any case, here's a hotel mirror shot of me at 8pm after getting up and dressed and out the door around 4am, trekking through the airport, Boston and 3 hours of driving. I think it looks damn fine. Whatever reservations I still had about the dress are gone! Especially since I shortened one of my black cardigans to pair with it (and a million other dresses!)
Tomorrow we are off to the City of Brotherly love for some fabric shopping, fried chicken and donuts, farm-to-table food and some general lovin' and kickin' around. I hope to get some more action-shots of my clothes. Soon! Happy Monday Blogland!
Travelin' me-made and retro style!
Hello blogland! I write you from a cozy room in Buzzards Bay, MA. We departed Home in Minneapolis at the less-than-charming hour of 5am to make our way across the country for our friends Barry and Monica's wedding! Look up #baronica2014 on Instagram for some of their awesomeness.
I am excited to be able to share some images of my entirely me-made wardrobe for this trip! It will be the first time my mom will get to see this batch of dresses. I learned my love of sewing from my mama who taught me to sew on the machine she made my baby clothes on. I am so pumped to show her the latest.
I am excited to be able to share some images of my entirely me-made wardrobe for this trip! It will be the first time my mom will get to see this batch of dresses. I learned my love of sewing from my mama who taught me to sew on the machine she made my baby clothes on. I am so pumped to show her the latest.
In addition, I am traveling with my train case for the first time and hoping to garner some insights and tips for making the most of train case travel. I have been surprised by how much I can fit inside. I've also been pleased by how easy it is to reach in frequently to grab this or that while we made our way around Boston and toward the Cape. I'll be snapping photos and gathering tidbits to share. I'd love to hear your tips and tricks, too!