About

You know how lots of parents have weird nicknames for their kids? You probably have one. And you didn't think it was weird until you got old, it's just what your parents called you. I'm Peach Pit. Also, Burger Bits. So when diving my blog personality and namesake it was no big stretch to Vintage Peachpit.

Born and bred on the East Coast I now dwell in the ever climatically-challenged Minneapolis, MN. I met my Dude here and his kiddo, the delightfully nicknamed Schnickle Pickle. We live a life of wine, sewing, super heroes, bacon breakfasts and hard-won weekend naps.

I love sewing. My mama taught me on the same machine she made my baby clothes on. I aspire to do things as well as she does. Some say Jack of All Trades, Master of None... This not does not apply to my mama. Everything she turns her hand to is beautiful, well-crafted and made and I want nothing more than to inspire the same.

I split my paycheck-earning time between working in the textile industry and teaching at the University of Minnesota. You'll hear a little about a lot in my blog.

Feel free to stalk... er, follow me on Instagram (VintagePeachPit) and Facebook (Sarah Sheber), too.

Credit for my blog background goes to: Am de las Heras on Behance

hair today, gone tomorrow

I have a roller coaster love affair with my hair. I want it pixie short, I want it Marilyn long. I want spikes, spit curls, bouffants, flips and poodle cuts. I want the Italian Cut. I want a mohawk. it is one of the most fabulous things about having short hair; I can do just about anything with a little patience between cuts.

As a little kid I have pretty straight hair. Blond. Bangs. I did not retain any of these things as I grew up, thank goodness! While blond, straight hair is certainly a lovely thing it wouldn't be great with the shape of my noggin or my coloring.

So, back to present-ish day. I had been growing my hair out into a retro bob to suit my clothing styles. But was starting to drive me mad. Here are a few shots from right before the chop!

The de-rigeur pre-cut bathroom selfie.
After a long day of travel from MN to MA... A little poofy but feeling good.
Since the majority driving reason for my curly poof was to have my hair match my clothes I decided I'd had enough. I wanted hair that was a little cuter, edgier. Less drying time. Cause really, I live in Minnesota and there is nothing like leaving the house to scrape the car in the dead of winter and realizing that whatever effort I had put into my hair was ruined by freeing instantly on stepping into -19 degree temps.

Annnnnnnd here's the new/old me! Short, pixie, spit curls and all. 


Here's my short list of how to take care of fine, curly hair:
1.) Keep it shoulder length or above.
      Longer than shoulder length starts weighing the hair down and making curl hard to control
2.) Condition with a light weight conditioner each time you wash it
3.) Use a minimal amount of product and try to mix up which product you use each day.
      I tend to cycle through 2-3 products at any given time. While my hair is very short I like
      pomade waxes, Lush's Dirty creme product, light leave-in conditioner or Aveda's curl creme.
4.) Let hair air dry whenever possible

Here are a couple more shots of pixie and other length styles I've rocked in the past couple of years. I really loved having pink hair but grew tired of the maintenance and, if you can believe it, getting touched by little old ladies and other folks in public. I dread to think of what will happen if I ever get pregnant...


To wrap things up I thought I would also share a few snaps of various hairstyles I've rocked in the years since I have moved to Minneapolis (just 3 years and so many styles of hair!) You'll also see that I am quite fond of making silly faces. I hope your enjoy them, too. 

The beginning of my mohawk and rockin' some dino earrings. Miss J likes to tell me that they are Apatasauri.
In full mohawk-y glory, getting ready for a holiday work party. I made the props for the photobooth that night.  

Sitting in the salon right before I asked my hairdresser to cut off the mop of curls I'd asked he to help me grow for six months... I love that my hairdresser gets pumped even when I ask her to change my style as soon as I've hit my last goal!


Hoppity Hop, snatched from Dolly Clackett

I was reading over on Dolly Clackett today about the blog writers blog hop and decided to throw myself in the ring. (She called it the cowards way out but I take it as a chance to dive in!)

If you are not familiar with Roisin's blog she's a delightfully funny lady in the UK who makes all manner of well-fitting novelty and bold printed dresses. I envy her shoe collection and have a crush on her geographic location (who wouldn't when a trip to Paris doesn't mean a small loan from the bank?! Except for the fabric I'd be hauling back...)

Anywho. Here I go taking up the gently set down torch:
1.) Why do I write?
Oh the lameness but it’s pretty basic. I like it and I think I am pretty good at it. I know I need to work to get my voice to come out in my blog the way it does when I write articles, cover letters and that sort of thing. But the short answer really is that I like it.

Why I write a blog is a little different. I have pretty strong feelings about personal history and leaving a mark. I’ve never had any interest in fame or renown but I do want my kids or future generations to have something they can look back on. I created my grad school thesis on the idea of memory as a tangible thing. It’s why I love vintage and antiques and thrift. Tiny, handmade poodle skirts made for some lucky kiddo. It’s all got history.

I just about gave up the ghost when I saw these. Right on the heels of, "How adorable?!"
I thought, "What a sweet gesture to make these for a kid you love..."

2.) What am I working on now?
Right now I’m actually working on planning some future blog entries on Fall/Winter sewing, working up the gumption to do some photos in my many dresses and also a modified Gertie’s Portrait blouse pattern that I’ve redrafted as a kimono-sleeved dress bodice. The new dress is cut from a hot pink waxed cotton I picked up on my summer trip home to Philadelphia. 

Here you can see that #jacknamedcat is also excited about the possibilities.
3.) How does my blog differ from other sewing blogs?
I don’t really know how to draft patterns but I do it anyway. I don’t follow many rules like pre-washing my fabrics or documenting the making process very thoroughly. But I freaking love sewing my own clothes. I completely lose myself when I sew. Hours gone by without feeling it. It takes me out of myself. Since I moved in with my Dude he’s actually given me a bunch of ideas for blog posts. I get going talking about something and he’ll inject a, “THAT’s what you write about!” He sees what sewing does for me and can draw out all sorts of observations that I have a hard time stepping back and seeing myself.

My fabulously stylish Dude and I at a friend's wedding this summer.
Such a hottie!

How does my writing process work?
In front of the TV, on lunch at work, notes in my phone… I’ve just started creating outline blog posts to keep track of various ideas. When I think about whether I want to write something down I think about whether I would want to read it. Is it worth the time writing it out? Would I want to be able to find someone blogging about something like this? Don’t I wish I could have found this info without having to slash up a pile of fabric and snarls of thread and… so forth and so on. 

Some posts brew away a long while, weeks even, before I think they are worth posting up.

I hope this was one of those thing! The enjoyable, glad I found it kind. Coming soon... thoughts on Fall/Winter sewing plans, re-evaluating my closet and how to stay warm this winter!

xo, 
Sarah

Burgeoning Bakelite bonanza

Like so many vintage-loving ladies (and gents!) I have a major heart-on for Bakelite. My collection has grown hugely this year and I thought it would be fun to share a few of the things I have found and the many ways I have seen Bakelite lovers store their stashes. 


My most recent finds are the unworn stacks in the upper left and lower right corners. This summer I discovered a vintage jewelry store called Ann & Jack's Vintage Jewelry in Hopkins (just west of Minneapolis) that has a great variety of vintage jewelry offerings. I brought little miss J last time and was so impressed with their store. They have a chest of treasures that your little ones can paw through and take a treat home for free! What a great way to help a mama out as she gets her oooh-sparkly fix!

Anywho, the most recent acquisitions are somewhat of a work in progress. The bangles in the lower right corner have some serious patina that I believe is hiding a light blue green (top) and a hot pink (middle). The bottom one might even have some strong blue streaks if I can get the layers worked down.

I am interested in learning more about how to restore the original colors and started off with Brasso. I'll also be looking to try Novus #3 and Turtlewax Chrome polish. I've heard good things. I'd love to hear if you have other suggestions!

When you start having a good sized collection you need to find a good way to keep all those beauties stored and displayed, too! 

On my Pinterest board Bangles, brooches and bags, oh my! I have saved lots of items that just make me go, "Ooooooooh...!" I've also started saving images of the different ways people store their bangles for your viewing pleasure. Here are a couple of my favorites!


I started out with this sweet jewelry box my mother gave me years ago. It has a nice, deep bottom compartment that worked really well! You can see here, though that my collection was already bursting at the seams. Time to start looking for other, inspiring ideas!

This coke-bottle options is super neat. What a fun way to sort and store your bangles! Plus, don't you just envy a collection so broad, varied and extensive??? *sigh*

I like this idea a lot, too. A great, inexpensive way to store and display. Plus, moving your bangles off of your dresser or vanity is great for freeing up surface area! In this bangle-fan's blog she mentions the benefit of being able to swap out towel tubes when they get exhausted. I think that's pretty good but I know it would drive me batty to have to replace them and also to have to take the tube off every time I wanted to sort through the bangles. Which is why...

This is the method I love most! These bangles are not my own collection but are the same sort of storage I use. I have been extremely lucky to find a couple of these boxes at different flea markets. I have a silvery blue one that I snagged for $7 and a salmony pink one I scored for just $2! It was super dirty but has cleaned up rather well and I have been happy with it so far. 

I feel like I have seen and known about Bakelite all my life. All throughout my childhood I remember being dragged (hey, I wasn't always jazzed but I am so glad my parents made me do things that interested them, too) to flea markets all over the region. We went to antique stores in New York, Pennsylvania, New Jersey. For several years in high school we hit up the Atlantique City Antique Show. It's a mega-huge gathering of small and big time dealers all gather under one roof. 

I remember seeing cases and cases stacked with Bakelite. Bangles, jewelry, phones, knives, etc, etc. These days, every Bakelite bauble I see is that much more precious and exciting to spot. I'd love to see shots of your own bangle storage and favorite bakelite pieces! Plus, I'm excited to share updates on the restoration process of my new bangles on Instagram. 

xo, 
Sarah


Today's post is brought to you by coffee. Spilled on me leaving the house.

Laziness and a lack of knowledge ruin wardrobes. It's true. I'm sure that when lots of us get an oil stain or some such thing on ourselves we think, "Well, there goes that dress/shirt/skirt/whatever." Particularly with t-shirts. It just never seems worth pursuing an alternative... or does it? When you rock vintage, me-made or otherwise investment garments you need to know your way around a stain remover.

Today I'm gonna share a few of my most favorite solutions to those wardrobe-destroying woes. All thanks to my mama, really.

I grew up with an amazing mom who just knew how to do... anything. Install a toilet? Make a perfect Christmas cookie? Sew a shirt? Yup. Remove a stain? Absolutely. She would re-attach buttons, shorten pants and fix busted seams. I thought it was normal. I wanted to be just like her. I keep these things in my cleaning closet just for those occasions when life, you know, just seems to happen.


#1 Carbona Stain Devils
I remember picking these up in the super market when we ran out of some formula. I don't remember which ones we kept around. I just knew that there were special formulas depending on what your stain was made of. In grad school I understood much better the chemistry behind these and what a miracle they really are. In my house as a grownup I keep the Fat & Cooking Oil formula as well as the Wine, Tea, Coffee and Juice formula.
You can order them online or find them at your local Jo-Ann's.


OxiClean Versatile Stain Remover Powder Large Image
#2 OxiClean
I hardly think there's a person in US who hasn't heard of this one. But, what you might not think of with OxiClean is that it is wonderful for removing age spots and marks from vintage fabrics and linens. Whenever my mom (who now runs an antiques shop) or I come across linens that look well taken care of but no less dingy and needing a little love, we use this. A recent batch of vintage homespun napkins came home with me covered in spots and emerged from oxiclean soaking to be a clean, even cream color. As they should! Remember to run anything you've soaked through the regular wash, too.


#3 Synthrapol Detergent
Looks boring and bland, right? Wrong! While I would use Carbona for known stains and OxiClean for less known stains I use Synthrapol for all sorts of fabric cleansing. When clothes are very dirty, have sweat stains, keep shedding dye (like when you buy an indigo-dyed fabric), Synthrapol is my go-to. I started using this in college during my Fibers classes to rinse hand-dyed textiles. It's safe for home use and super efficient. A very small amount go a long, long way! I'll soak the family tablecloth in this after a holiday and have an easy-peasy time getting the marks out. It's gentle on fibers and tough on stains. Also, it has no added colors or fragrances!

All three products are pretty affordable and findable. I've included links in the title bits of each for your easy reference. Keep these ideas in your back pocket (or laundry closet!). It sure helps to know there's hope for your "ruined" clothes when you are livin' la via me-made!

xo
Sarah

Travel packing and livin' la vida me-made.


 Vacation in progress! Here we are in Cape Cod, MA ready to get our Yaaaay! on right before Barry and Monica began their epic walk down the aisle. Mike looked amazing in his seersucker suit and Venetian boater hat. Sometimes he tries to rebel against his hipster-inclined ways but I am usually able to cajole him into owning it. He's a beautiful man and can pull of strong colors and statement pieces. Once he takes the plunge he rocks it pretty hard. I knew he would for this trip, too.

I wore a modified version of Butterick 5748. It's the regular bodice with the notch in front. I had previously made the neck-gape adjustment to my pattern pieces and the tiny amount of leftover gape was handled beautifully by the ease created by the notch. I added an extra-full gathered skirt and in-seam pockets for this version and am pretty pleased with the results over all! This is the first time I applied a rick rack trim over the surface instead of as an edge treatment. It was also the first time I used the basted-shut zipper technique I saw here. I have done once or twice since then and will definitely be incorporating it into future garments!


Certainly I must be getting ahead of myself, though! In my last post I talked about sharing some of my me-made wardrobe travel tips and observations.

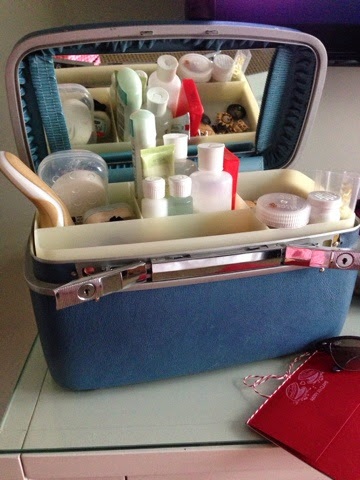
Here are a couple of shot showing my packing in-progress. I hung out all of the dresses I planned to take on this trip so that I could coordinate jewelry and shoes. I tend to gather everything up on the bed before starting to fit it into my bags. I have been traveling with a 1-bag rule for a few years now. The addition of my train case is definitely a break of tradition and I wanted to make sure I wasn't just taking along additional things for the hey of it.

When packing I come to a point that I just know that I have reached the tipping point. I prefer to leave a little extra room in my bags to allow me to bring home treats for myself and my stepdaughter.
 Mommy Dearest's line may be "No wire hangers!" but my own is, "No checked baggage!"

1- sorely dislike waiting for the carousel
2- becomes difficult to carry it all solo
3- risk of loss is too high
4- mid-trip changes increase risk of loss
5- traveling with vintage or me-made means not   being able to replace things = heartache

I've encountered a lot of drama in my travel. I have learned to cut it out wherever possible.


Because I'm a nutball I, of course, had a last dress in-progress the night before we left. I promised myself (and my boyfriend who kept eyeing my pile of dresses with trepidation and a hairy eyeball) that if I finished the new dress one of the trip dresses would come out of the pile and the new dress would get work on the plane.

I've been working on tweaking a self-drafted bodice to include a v-neck.  In the purple striped dress below it worked out quite well! After making the pink dress I think the bias is the reason is worked so well.

In any case, here's a hotel mirror shot of me at 8pm after getting up and dressed and out the door around 4am, trekking through the airport, Boston and 3 hours of driving. I think it looks damn fine. Whatever reservations I still had about the dress are gone! Especially since I shortened one of my black cardigans to pair with it (and a million other dresses!)


The last dress for this post is the purple striped number i mentioned above. If you follow me on Instagram then you've seen it already. This was my first try at pattern matching! I'm super pleased with the results. I even found that I could get in and out of this dress without inserting a zipper. I'm still on the fence about whether to go back and put one in. I mostly think it would make getting dressed easier... What do you think?

Tomorrow we are off to the City of Brotherly love for some fabric shopping, fried chicken and donuts, farm-to-table food and some general lovin' and kickin' around. I hope to get some more action-shots of my clothes. Soon! Happy Monday Blogland!

Travelin' me-made and retro style!

Hello blogland! I write you from a cozy room in Buzzards Bay, MA. We departed Home in Minneapolis at the less-than-charming hour of 5am to make our way across the country for our friends Barry and Monica's wedding! Look up #baronica2014 on Instagram for some of their awesomeness.

I am excited to be able to share some images of my entirely me-made wardrobe for this trip! It will be the first time my mom will get to see this batch of dresses. I learned my love of sewing from my mama who taught me to sew on the machine she made my baby clothes on. I am so pumped to show her the latest.


In addition, I am traveling with my train case for the first time and hoping to garner some insights and tips for making the most of train case travel. I have been surprised by how much I can fit inside. I've also been pleased by how easy it is to reach in frequently to grab this or that while we made our way around Boston and toward the Cape. I'll be snapping photos and gathering tidbits to share. I'd love to hear your tips and tricks, too!

Getting over the hump, a little bit on motivation

I LOVE teaching. And, I LOVE sewing. Challenge is I don't love writing my syllabus. We are about to go off on vacation to Boston, Philadelphia and New Jersey and really, really need to get my syllabus finished and my first lecture ready to go. We come home only 3 days before classes start.

I have a whole heap of fabrics just screaming at my from the cutting table to become the next wonderful thing I get to wear and so I have given myself the mandate that all of my syllabus and first week of class materials need to be ready to print before I can get back to sewing.

 So what do I do? Go buy more fabric, of course. My boss is an experienced pattern maker and we have a lunchtime pants-making chat set up this week. The first pair of pants I made were such an enormous, colossal failure that I decided I absolutely must seek out help.


Every review I have read about Butterick 5895 talks about success. Many sewers seem to have success right out of the envelope. A few needed minor tweaks. Only two reviewers have talked about them being bad in the first go. Even one of those lovely ladies just ate her words! Tasha of By Gum, By Golly looks fabulous in hers. I went to Joann's on my groceries trip today thinking I would just get what I needed to try making them.

I also found this beautiful ikat seersucker that was on sale for $7/yd and couldn't help myself. Why am I writing this blog instead of finishing my syllabus? Can't you see I am my own worst enemy! Oh, reader, encourage me to do what I need to so I can keep making fun frocks and things.

Wish me luck!

Is it truly awesome? And other vocabulary abuses.

I am a frequent user and abuser of the word "awesome". I try to inject more diversity into my daily vocabulary but I find that in my less conscientious moments I default to overuse of "awesome" to express excitement and satisfaction. I am a hypocrite.

*bespoke* will be at Fair Indie this weekend!
Oh, but you can! I dislike to overuse of words when the overuse depletes the power and meaning of a word. When a friend or coworker asks a question and I am able to give an answer? "Thanks! Awesome!" Although I appreciate the vigor of the response I doubt much of what I do on a day to day basis or what I know is truly awesome.

Things that are truly awe-some:
-taking in the view from the rim of the Grand Canyon
-my last mountain-top sunrise when I lived in Lesotho
-hearing my boyfriend's daughter speak about her body without shame, guilt or fear

Things that rock, are very exciting, make me smile:
-delicious food
-waking up next to my dude every morning
-seeing dude's daughter accomplish a new skill or take a new risk

Here is a promise to myself to keep invigorating my linguistic skills and the depth of my vocabulary. Join me!


The Batter Up! daydress

During my day off last week I was very happy to spend the whole day home and sewing. And doing laundry. And cleaning the cat's water fountain, etc, etc. Still, mainly, a sewing day!

After my most recent trip to SR Harris I had a really hard time deciding which of my new fabrics to start with. Looking through my box of trim I decided to make up this fun blue dot print with some extra wide rickrack trim from my stash. I went back and forth about it since it made me think of baseball right away. I love the kinda '40's, kinda '60's pop Deco feeling of it.

I keep all of my TNT pattern pieces in their own envelopes. Separate bodice and bottom pieces. Mix and match heaven! I have a whole envelope of pocket pieces, too!

I started out with my kimono sleeve bodice block and a basic gathered skirt (I use a tapered hip line instead of a straight rectangle to reduce bulk). I laid all of my bits out and just wasn't feeling it. So I scrapped the kimono sleeve bodice and instead opted for my newly modified Butterick 5748 bodice! I made this up as a test run for a dress I am wearing to a friend's wedding later this month. With the first try there was major neck gaping and the back is so low that I can only wear it with one bra that I own. 


B5748

To eliminate the neck gape I followed the advice of berni and i . Her step-by-step was perfect for altering a one-piece bodice front with waist and bust darts. It's giving me the confidence to go back and fix some other patterns with similar problems. Don't fear the dart!

As a side note, I generally don't pre-wash my fabrics unless I am sure that the sizing is corn-based (I have an allergy). I find that most fabrics are so much easier to cut and fit in their fresh-off-the-bolt state. Plus, my ironing and pressing time is greatly reduced and my washing machine is saved the trouble of loose yarns tumbling around the center holding my towels and underpants hostage. 

In the future I hope to share additional tidbits about organization, pattern tracing, storage and modifications. I love reading about other bloggers organization and tips and tricks. 

Next up: pictures of the finished dress! And some Bakelite love. 

Happy sewing!